Ladurée French Macarons Recipe – Easier Than It Seems!
I’ve been really wanting to try baking macarons ever since I started baking. Macarons, crepes, and chocolate covered strawberries are my all-time favourite desserts so I really want to master all three. Problem is: macarons are super hard to make, so I’ve been biding my time before I attempt them. You need really precise measurements and you need to do everything exactly as ‘they’ tell you to for them to turn out well. Luckily, little old me was gifted with a baking scale from my sister for Christmas, so today was dedicated to my first ever macaron baking adventure! Here is my Ladurée French Macarons Recipe.
Picking A Recipe
I looked at a couple of different recipes online before I decided which one to use. At first I was looking at Martha Stewart’s but her’s uses sliced almonds and then processes it (so extra) and I just wanted to use pre-processed almond flour just to save time and money. I ended up searching up ‘Ladurée french macarons recipe’ because hellloooooo? Those ones are the best, and I know they have a few recipe books out. I stumbled across a post by another blogger – you can see her macaron recipe here. This is the recipe I used to base mine off of.
Macaron Cookie Ingredients:
275g almond flour
250g confectioners suger (icing sugar)
6 & 1/2 egg whites
210g granulated sugar, split into three different bowls of 83g
Macaron Cookie Directions:
Start with a food processor
Mix the almond flour and confectioners sugar in a food processor for a very short period of time – the mixture should be soft and powdery and be easily sifted into another bowl. My notes: I only have a very small food processor, and the almond flour I had was this stuff which is a flour/meal…. so it’s a bit grainy. 🙁 I processed the two together bit by bit but the bottom part only stuck together and it didn’t work very well. I re-processed the grainy bits again right before mixing it in with the egg whites. It wasn’t the finest flour mixture, there were still some grainy bits but it didn’t seem to do too much damage to the end result.
Whisk away!
Whisk 6 of the egg whites together in a large bowl – way easier in a Kitchen Aid, just turn it on to a medium speed and watch it until it’s foamy. Then add the first third of granulated sugar – 83g, and continue whisking until the sugar has dissolved. Then, add the next third (83g), and whisk for another minute, then repeat with the last third (83g) of sugar, and again whisk for only another minute. The original recipe said that at this point the egg white mixture should be glossy and hold soft peaks (just google image search that if you don’t know what it means). Mine was not like that, it was a lot more of just a white watery substance, so I ended up whisking it for a bit longer until it looked to have a bit of a thicker consistency.
Time to learn how to fold.
Slowly fold in the dry batter with the egg white batter. To do this I used a big spatula and had my boyfriend slowly poor in the sifted almond flour/icing sugar while I continuously folded the batter. Once it’s been combined, whisk the other 1/2 of an egg white until it’s just frothy and then fold it into the batter. This helps “loosen” the macaron batter – you’ll know what that means when you do it.
Now take a breath. You’re doing GREAT!
This is the point at which you can add food colouring if you want that classic pastel macaron look. I didn’t add any to my own just because I didn’t want the added step (quit while you’re ahead, am I right?)
How To Prep For Baking
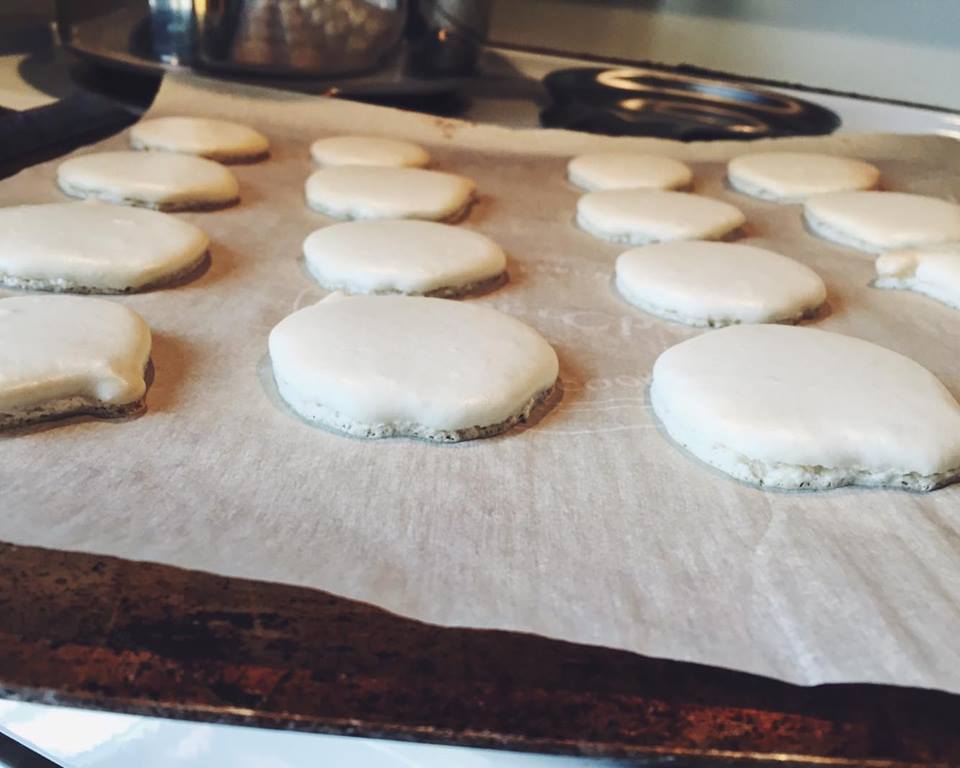
Line your baking sheet using normal parchment paper (that’s what I used), or using a reusable sliplat sheet (many believe these work a bit better for cooking macarons as they’re easier to peel the cookies off of after baking). Adding your mixture to a piping bag can be messy business. You can buy a proper piping kit, or use a plastic zip-lock bag and cut a little bit off the corner. Out of desperation, I used the latter. Pipe about 1 & 1/2 inch wide circles onto your baking sheet. The original recipe says to tap the baking sheet lightly on the counter to release any air pockets, but I forgot to do this. Let the macarons sit on the baking sheet for about 10-15 minutes before popping them in the oven so that they can dry a bit first, they should start forming a soft shell and little foot – the classic macarons look.
How To Actually Bake Them
Bake at 300F for about 10 minutes. The original recipe says 15 but I definitely misread it and only baked mine for 10… I always check my baking a few minutes before they’re supposed to be done just to make sure they don’t burn. For these I baked 3 batches, the first were in the oven about 9 minutes and cracked a ton. The second were in for a good 10 minutes and were the best ones I made. The third were in for just under 10 and were a bit sticky to the parchment paper. If you’re a baker you generally know your oven better than a recipe does so go with your gut and keep an eye on it to get the perfect macaron!
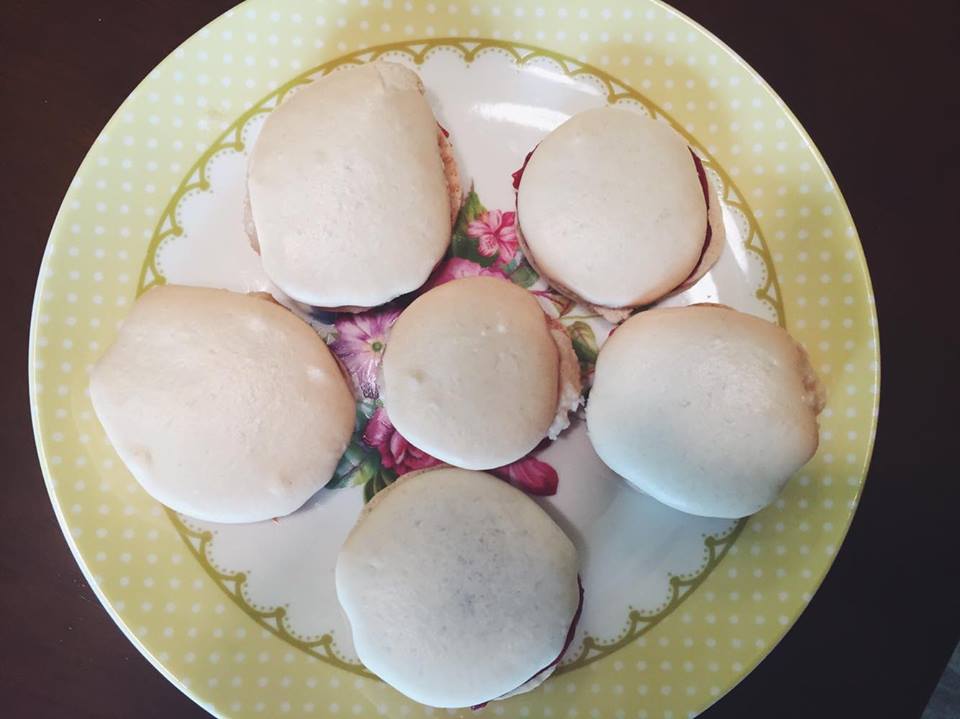
You need to let the macarons cool completely before peeling them off. If you don’t they could crack or stick to the sheet. I always use this time to get started on some fillings.

Macaron Fillings
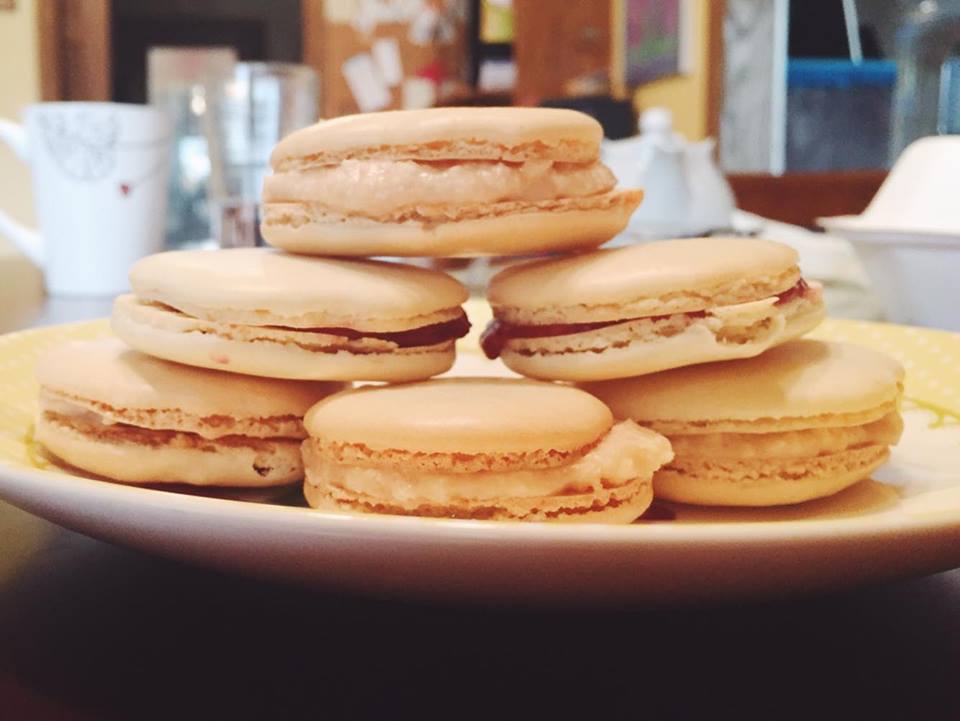
Okay. There are tons of recipes out there for these so if you have your heart set on any just go ahead and google search it and you should be good to go. For my own I used two separate kinds of fillings: vanilla buttercream, and raspberry jam.
Vanilla Buttercream
1 cup softened butter
1 & 1/2 cups icing sugar (I ended up using about 2 cups because I added some more)
2 tablespoons whipping cream (you can use mostly any kind of milk – the less thick the type of milk the runnier the consistency of the buttercream)
1 tablespoon vanilla
Directions
1. Beat the butter until creamed (I used a Kitchen Aid with the paddle attachment).
2. Add in the icing sugar 1/2 at a time, beating each third until combined before adding another.
3. Add in vanilla and a pinch of salt and mix until evenly combined.
4. Add in milk or cream and mix until you reach the consistency you want. If it’s too runny, add a bit more icing sugar.
5. Pipe onto bottom of macaron cookie and stick together with another macaron cookie.
Raspberry Jam Filling
3 tablespoons raspberry jam
1 tablespoon softened butter
A splash of whipping cream
Directions
Mix the ingredients together until combined. Pipe onto bottom of macaron cookie and stick together with another macaron cookie. My notes: I used a whisk and mixed it by hand. My butter wasn’t quite soft enough so I popped it all into the microwave for about 8 seconds and then continued mixing.
Overall Notes
For the cookies…
Be gentle with them, fold the batter in really slowly. Even when you’re checking on them in the oven, only open the door a crack so you can peer in. You don’t want to disrupt the heat or the stability of the cookies. Make sure you don’t hold onto the batter while it’s in the piping bag, you need to push it out from above otherwise your hands will be heating up the mixture and that may make it a bit runnier. Don’t try and pipe the batter into a circle, just press it all down and let it form a circle on it’s own. There are videos on Youtube so if you’re not sure what I mean, just search it!
For the fillings…
If your butter isn’t soft enough for the buttercream, pop it in the microwave before you make the filling – otherwise it will end up a bit chunky. Match up similarly sized cookies before you start piping on the filling. Pipe on the filling from the inside of the cookie outwards and don’t line it entirely. When you press the two cookies together the filling will even out and press out to the sides of the cookie.
*Jemma, from Crumbs and Doilies does a lovely Buttercream Tutorial that tells you everything you need to know and more to make the perfect buttercream! This video has been super helpful for me in the past.


I love that these treats are gluten free because it means everyone in my family can enjoy them! They’re all very much loving the ones I made and said they’re better than the ones I brought home from the bakery on Valentine’s day – definitely a lot more successful than I thought my first attempt would be! Let me know what you think and if you have any tips or recommendations 🙂 Thanks for reading!
More Baking Posts | Happy Valentine’s Day!
Instagram | Twitter | Tumblr | YouTube | Facebook
contact: arcticsabrinabusiness@gmail.com
Ooh, yummy!! Would love to try these sometime.
xoxo
Caylie
https://soulpaletteblog.wordpress.com/
I also love baking.
I’ve been wanting to try baking macaroons for some time now, the recipe’s are difficult as you mentioned but your expierence makes me think I might be able to get a nice result. I don’t have a food processor, would you suggest sifting the almond flour and sugar multiple times instead?
You can try sifting it but my almond flour was too corse to go through. You could also try mixing it in a blender in short bursts, mixing it around in between to make sure it doesn’t get too warm and tacky, that’s what I ended up doing! Hope it all goes well for you😊